
In order to provide the most insightful data, Webtrends requires that you use a strong method of identifying visitors. For Webtrends Analytics, strong identification methods are cookies and authenticated user IDs. For Webtrends Visitor Data Mart, cookies are required to track visitor-related data. Because cookies are the recommended best practice, the articles in this section focus on cookies. The articles explain the differences between first-party cookies and third-party cookies and describe how you can use cookies to track visitor sessions. For information about alternative methods of identifying visitors for session tracking, see “Visitor Identification” in the Webtrends Guide to Web Analytics.
This article assumes that you use Webtrends Analytics On Demand or have installed Webtrends SmartSource Data Collector (SDC) and have configured an SDC site map. For more information about installing SDC and configuring an SDC site map, see the “SmartSource Data Collector Installation” in the Webtrends SmartSource Data Collector User’s Guide. If you do not intend to use first-party cookies with SDC, see “Using First-Party Cookies Without SDC.”
What is a Cookie?
A cookie is a piece of identifying data, typically created by a web server. A web site sends a cookie to a visitor’s browser and stores it on a visitor's computer either temporarily (for that visit session only) or permanently on the hard disk (or until the visitor deletes them). Temporarily stored cookies are called session cookies. Cookies stored on the hard disk are called persistent cookies.
Persistent cookies can identify a visitor as a new or returning visitor by storing a value that uniquely identifies each visitor. If a visitor has been to the site before, a cookie is sent to the web server with the request for a particular page. The web server checks for the presence of a cookie in the request and if no cookie is detected, the web server generates the cookie and sends it with the response to the visitor’s browser. When the visitor returns, the cookie is included in the request, the web server detects the cookie and recognizes the visitor as a returning visitor. The web server then writes the cookie to the log file in the cs(Cookie) field.
How Webtrends Uses Cookies
As long as the visitor’s browser accepts cookies and the visitor does not delete the cookie from the computer, Webtrends can use the cookie to determine whether the visitor is a returning visitor or a first-time visitor. Webtrends can also use cookies to strongly identify visitors and use this information to develop a rich repository of visitor history which you can use for reporting.
Cookie Rejection
Why Web Browsers Reject Cookies
Whether web browsers are likely to accept a cookie strongly depends on whether the cookie is a first-party cookie or a third-party cookie.
cookie served from a domain other than the domain that your visitor requests from your web site is considered a third-party cookie. Webtrends On Demand and SmartSource Data Collector (SDC) have historically used cookies as the primary method to obtain visitor information.
Tracking visitors accurately is paramount for confidence in your web analytics results. Studies by leading analyst research firms such as Jupiter Research and Forrester have indicated that increasingly high-rates of cookie rejection and deletion by Internet users makes third-party cookies an unreliable method for collecting and reporting on web marketing results. In fact, Jupiter currently believes third-party cookie rejection rates are as high as 28%.
In response, Webtrends conducted its own research, analyzing third-party cookie rejection rates for 5 billion visitor sessions between January 2004 and April 2005. Webtrends research found cookie rejection rates to be somewhat lower but still significant, revealing that on average 12% of Internet user traffic is blocking or preventing third-party cookies from being set on computers, and that this trend can be as high as 17% for some vertical industries, such as retail. In addition, when analyzing the third-party cookie rejection trend since the beginning of 2004, Webtrends findings show that third-party cookie rejection has increased by a factor of four to its current rate.
Internet users commonly reject third-party cookies as part of their security measures. Some of the most common reasons for the increase in the rejection of third-party cookies are:
- Anti-spyware programs are designed to remove cookies that surreptitiously monitors visitors’ web activities. These programs often consider hosted web analytics services to be spyware and thus target their cookies for removal from your visitors’ computers.
- Current browser technologies such as Microsoft’s Internet Explorer and Mozilla’s Firefox make it easier for visitors to reject third-party cookies.
Negative Impact of Third-Party Cookie Rejection
Cookie-dependent analytics solutions rely on the cookie as the method to identify one unique browsing session from another. There are a number of business issues that arise from third-party cookies being rejected or deleted on a regular basis:
-
Inaccurate Visitor Metrics: At its most fundamental level, if an Internet user has configured the browser security settings to automatically reject third-party cookies, that visitor will not be properly counted in your web analytics results. As mentioned earlier, market estimates project this to be anywhere from 12% to 28% of Internet users on average.
-
Deceiving Retention Based Metrics: Taking this one step further, if "John Doe" visits your web site on May 15 and accepts the third-party cookie, he will be recognized as a new visitor. If John then deletes all of his third-party cookies with his anti-spyware application on May 16th and returns to the site on May 17th, the analytics solution will identify John as a new visitor, since he no longer has the cookie on his computer. This would have an impact of under representing your retention based metrics such as your repeat visitor rate.
-
Inaccurate Conversion Metrics: Cookie deletion also has an impact on your conversion rate for new visitors versus repeat visitors.
Conversion rate = (conversion actions taken/number of visitors) X 100 where a conversion action is an action indicating visitor conversion, such as an order, and the visitors may be new or repeat visitors.
As pointed out in the John Doe example, above, if the cookie is being systematically deleted, repeat visitor rates are going to be under-counted and new visitor rates are going to be over-counted, skewing your conversion rate metric by which you analyze your site's overall effectiveness.
- Unreliable Campaign, Search, and Merchandising Reports: In addition to tracking the behavior of a visitor to the site in general, many analytics providers correlate visitor response and site interaction to a specific campaign, search engine or product in an attempt to understand precisely which campaign or merchandising offer inspired the Internet user to take an action; much of this information can rely on information stored in the cookie. If the cookie is rejected or deleted from the Internet user's browser, reports designed to identify latent or deferred conversion to a campaign or merchandising offer will be misrepresented. It is also important to note that the longer that you track conversion to an individual marketing activity, the more likely it is that your metrics are inaccurate, as the likelihood the user deletes the third-party cookie increases.
Solving Rejection with First-Party Cookies
For most business models, first-party cookies are regarded as the most reliable method to measure visitor activity. A cookie served directly to your visitors by your own web server and registered by the browser is a first-party cookie. Whereas a third-party cookie is set by the analytics vendor, an entity with which the web site visitor does not have a relationship, the first-party cookie is set by the business or organization with which the Internet user has specifically chosen to do business. Because of this relationship, the first-party cookie is deemed a more secure cookie by the user.
First-party cookies are considered less of a security risk than third-party cookies and are more likely to be accepted by the browser. By issuing first-party cookies, your benefits include:
- Most accurate visitor metrics
- Compatibility with data collected from existing Webtrends data sources that used Webtrends third-party cookies
If you use Webtrends Analytics software, you may already have a method of setting first-party cookies. If you use Webtrends Analytics On Demand or Webtrends Analytics software with SDC, your Webtrends JavaScript tag is configured to use first-party cookies by default. For more information, see “Using the JavaScript Tag to Track Cookies,” below.
How Webtrends Uses Cookies
As long as the visitor’s browser accepts cookies and the visitor does not delete the cookie from the computer, Webtrends can use the cookie to determine whether the visitor is a returning visitor or a first-time visitor. Webtrends can also use cookies to strongly identify visitors and use this information to develop a rich repository of visitor history which you can use for reporting.
Methods for Generating First-Party Cookies
You can generate first-party cookies that Webtrends can use to track visitor sessions using one of the following methods:
- Allow the Webtrends JavaScript tag to serve cookies
- Configure your web server to serve cookies
- Use the Webtrends Cookie Plug-in to serve cookies
This article discusses each of these methods.
Using the Webtrends JavaScript Tag
If you use Webtrends On Demand or Webtrends software with SDC, your best choice for generating first-party cookies is by allowing your JavaScript tag to generate them. By default, the JavaScript tag generates the first-party cookie and passes it in the query string as the WT.co_f query parameter. With this method, you do not need to configure your web server to generate cookies. For more information see "Using the JavaScript Tag to Track Cookies," below.
Using Your Web Server to Generate Cookies
Most modern web servers contain functionality for serving cookies. If your web server is already configured to serve cookies, you should use this cookie to identify your visitors. This method is suitable whether you use Webtrends software or Webtrends On Demand.
This section describes how some commonly used web servers deliver cookies.
Apache Web Server
Apache provides the mod_usertrack module for click stream logging of visitor activity on a site. Mod_usertrack sets a cookie with a unique identifier. Enable mod_usertrack.so by adding this dynamically shared object to the LoadModule list, and setting the “CookieTracking on” directive in the httpd.conffile. The following directives provide additional control: CookieDomain, CookieExpires, CookieName, CookieStyle.
For more information, see www.apache.org.
Microsoft Internet Information Server (IIS)
Active Server Pages
Microsoft ASP supports the notion of a session management through the Session object. Session keys are stored in the ASPSESSIONID cookie.
As an alternative, you can manage your own tracking cookie using the Response.Cookies Collection of the Response and Request objects.
For more information, see www.microsoft.com.
Site Server
Microsoft Site Server includes a User identification Filter (ISAPI filter) called mss_log.dll. This filter generates a 32-byte GUID that is stored in the SITESERVER cookie.
For more information, see www.microsoft.com.
iPlanet/SunOne
Planet/SunOne’s servlet engine supports Java Server Pages. You can manage your own tracking cookie by using the Cookie class and the HttpServletResponse.addCookie method, and the HttpServletRequest.getCookies method.
For more information, see www.oracle.com.
Configuring Webtrends for First-Party Cookie Tracking
If you use Webtrends On Demand or Webtrends software with SmartSource Data Collector, you can configure your JavaScript tag to recognize the first-party cookie method that you use. By default, the JavaScript tag generates the first-party cookie for you. For more information, see “Using the JavaScript Tag to Track Cookies,” below.
If you use Webtrends software without SmartSource Data Collector, you simply need to create a Session Tracking definition configured to use your cookie.
Using the JavaScript Tag to Track Cookies
If you use Webtrends On Demand or Webtrends software with SmartSource Data Collector, the JavaScript tag is configured to track first-party cookies by default. Use the Tag Builder to create your tag and specify any additional cookie settings. The following procedure has four main steps. Use the following steps in sequence to configure first-party cookie tracking.
Step 1: Build a JavaScript tag.
Use the Tag Builder at tagbuilder.webtrends.com to create your tag and specify any additional cookie settings.
Step 2: Implement the JavaScript tag you created using the Tag Builder.
Implement the Webtrends JavaScript tag on all the pages that you want to track. You can place the JavaScript tag anywhere between the <body> and </body>tags on a web page. Placing the tag at the top of the page directly after the <body> tag allows the tag to execute even if the page does not fully load. However, we recommend you place it at the bottom of the page just before the </body> tag to ensure the JavaScript tag is only activated after the page fully loads and all the information that the tag needs is available.
In addition to placing the tag directly in your web pages, there are other methods for tagging your pages which can make it easier to tag many pages quickly. Alternatively, you can place the tag in a client-side include file or place the tag in a footer template. For more information on these options and tagging best practices, see “Client-Side JavaScript Integration” in the Webtrends Analytics Implementation and Maintenance Guide.
Step 3: Edit a profile and specify the first-party cookie data source
- In the left pane, click Administration > Web Analysis > Reports & Profiles.
- Mouse over a profile and click Edit on the Action menu.
- Click Analysis > Data Sources.
- Click New.Note
If you use Webtrends On Demand, you cannot specify a new data source. You simply need to specify the first-party cookie data source for this profile. Click Save, and go to “Specifying Session Tracking for First-Party Cookies.”
- In the Data Sources dialog specify the name of the server and select the data source.
- Click Save, and your new data source for first-party cookies appears in the list of data sources for that profile.
If your web site has multiple domains and you want to tracking visitors across them, you must create a separate data source for each domain. For more information, see “Configuring Domains” and “Tracking Visitors Across Domains.”
Step 4, For the same profile, specify session tracking for first-party cookies:
Session Tracking definitions determine how Webtrends identifies visits and counts unique visitors.
To specify session tracking:
- In the left pane, click Administration > Web Analysis > Reports & Profiles.
- Mouse over a profile and click Edit on the Action menu.
- Click Analysis > Session Tracking.
- Clear the Always Use Default Definition check box.
- Click Track User Sessions Using First Party Cookie.
- Click Save.
Configuring Domains
By default, the domain for the first-party cookie is populated with the actual domain that served the page. If you need to track visitors across different domains, make sure that you configure your JavaScript tag to set the domain that should be associated with your first-party cookie.
Consider the following domains:
- www.newstuff.webtrends.com
- www.standardstuff.webtrends.com
- www.ultra.cool.things.webtrends.com
All of these domains are subdomains of www.webtrends.com, which is a root domain. Therefore, in the Webtrends On Demand user interface, you would specify .webtrends.com (note the leading period) to track cookies across these domains.
Also, note that another domain such as www.Webtrends.store.com can be a separate root domain that belongs to the same Webtrends account. Using Webtrends cross-domain tracking, the same visitor ID can be moved from one domain to another. This is because Webtrends On Demand can recognize that all four domains are members of the same account (Webtrends).
You can specify the domain for your cookie when you create your tag using the Webtrends Tag Builder.
Tracking Visitors Across Domains
If you use Webtrends Analytics On Demand or Webtrends Analytics software with SmartSource Data Collector and you have multiple domains, your visitors will have a different first-party cookie set on each domain as well as a third-party cookie for your account. They will be reported as unique visitors to each domain when you use first-party cookie session tracking methods. However, Webtrends can track your first-party cookies across domains by using the third-party cookie that identifies your domain.
You can create a separate profile to track your visitors across your domains using the Account Rollup data source, keeping in mind that this data source uses the Webtrends third-party cookie for tracking visitors. The visit and visitor counts will be different when using this Account Rollup data source, compared to your more reliable first-party cookie profiles. However, it can provide you with meaningful insight into your account traffic if needed.
Cross-domain tracking applies only to SDC data files. You cannot analyze both web server data and SDC data file and then perform cross-domain cookie tracking using the SDC account rollup data source.
As a best practice, Webtrends recommends that you use first-party cookies to identify enterprise-wide, cross-domain behavior and trends. This method leverages a Webtrends third-party cookie to establish the first-party cookie, which tracks visitors across the specified domains in your data sources. If the visitor rejects third-party cookies, the first-party cookies continue to identify the visitor; however, that particular visitor appears as a different visitor for each domain.
To track visitors across domains in Webtrends Analytics software:
-
Create a separate data source for each domain. For more information, see “Configuring Domains,” above.
-
In the left pane, click Administration > Web Analysis > Reports & Profiles.
-
Edit a profile.
-
Select Analysis > Session Tracking.
-
Select Track User Sessions Using First-Party Cookie (Account Rollup). You might need to clear the Always Use Default Definition check box.
-
Click Save.
NoteYou can make further modifications to your profile setting if necessary by editing the profile after you have saved it.
To track visitors across domains in Webtrends Analytics On Demand:
- Create a separate data source for each domain. For more information, see “Configuring Domains,” above.
- Create your tag using the Tag Builder at tagbuilder.webtrends.com.
- Select Web Analysis > Data Sources and then select all of the data sources you want to analyze for this profile. Be sure that for each data source checked here, you generate the tag using Tag Builder and that you update the tag on every page of the domains affected. Missed pages will not be counted. The tag generated on the Data Sources tab does not support cross-domain tracking for Visitor Data Mart profiles.
- Select Web Analysis > Reports & Profiles.
- Edit the specified profile.
- Select Analysis > Session Tracking.
- Select session tracking options:
- For Visitor Data Mart profiles, select the option that matches your selection under Visitor Data Mart Specific Visitor Tracking on the Advanced Settings tab in Tag Builder. The default selection in Tag Builder and in-Session Tracking is Use standard Webtrends Visitor ID (
WT.vt_sid). - For Webtrends Analytics profiles, select Track User Sessions Using First-Party Cookie (Account Rollup).
- For Visitor Data Mart profiles, select the option that matches your selection under Visitor Data Mart Specific Visitor Tracking on the Advanced Settings tab in Tag Builder. The default selection in Tag Builder and in-Session Tracking is Use standard Webtrends Visitor ID (
- Click Next.
- Click Save.
- The reports for this profile show aggregated data for the domains that belong to that account.
Webtrends On Demand Business Edition does not support cross-domain tracking.
Converting Third-Party Cookies to First-Party Cookies
If you have an existing Webtrends On Demand account that uses third-party cookies, you can add the first-party cookie tracking to your JavaScript tag. After the tag is implemented on your site, visitors immediately begin to receive the first-party cookies. Webtrends On Demand and SmartSource Data Collector (SDC) have built-in logic to stitch visitor records together to ensure a smooth transition from the third-party cookie methodology to the new first-party cookie methodology.
To convert third-party cookies to first-party cookies:
- Modify the JavaScript tag as described in “Configuring Webtrends for First-Party Cookie Tracking,” above.
- Update all your web pages to use the new JavaScript tag.
- Wait 24 hours until analysis of the visitors who were tracked using the third-party cookie session tracking has completed.
- Change the profile so it uses the first-party cookie session tracking definition.
Customizing Tag-Generated First-Party Cookies
If you use Webtrends On Demand or Webtrends software with SDC, you can customize the persistence and expiration date of your first-party cookie.
Creating Session Cookies
If you want to generate session cookies rather than persistent cookies, you remove the expiration date parameter from the cookie. However, this is not recommended because Webtrends cannot use session cookies to accurately track unique visitors to your site. Also, visit counts are inaccurate if the visitor closes the browser, reopens it and immediately returns to your site. In this case, the visitor is identified as a new unique visitor, and the visit is considered a new visit to your site.
To create session-based first-party cookies:
-
Create your tag using the Webtrends Tag Builder.
-
Modify the following line in the tag code:
var expiry="; expires="+dExp.toGMTString();so that it looks like this:
var expiry=""; -
Implement the tag on your web site, replacing any existing tags, and redeploy the updated pages to your web site.
Since session cookies are only valid for the current visit, they cannot be used to accurately report on many aspects of visitor data, including unique visitors, campaign tracking, commerce tracking, search engine history, and other visitor history based analysis reports. Because the use of session cookies may alter the statistics in reports from what you are used to viewing, you should try session cookies on one profile as a test model and look at the numbers in the resulting report to see if that is what you were expecting. After you accept the results, you can apply session cookies to other profiles.
Configuring Cookie Expiration
With Webtrends v7.5 and higher, the first-party cookie set by the JavaScript tag is configured to expire in 10 years. You can change the expiration by modifying the time value parameter in the statement.
To configure the first-party cookie expiration:
-
Create the tag using the Webtrends Tag Builder.
-
Edit the following line in the tag code:
var dExp=new Date(dCur.getTime()+315360000000); -
315360000000represents the total number of milliseconds in 10 years. Change this value to the number of milliseconds from the current time until the time that you want the cookie to expire. For example, if you want the cookie to expire in 60 days, then change this value to 5183940000 = 60 (days) * 24 (hrs per day) * 60 (minutes per hour) * 60 (seconds per minute) * 1000 (milliseconds per second). -
Implement the modified tag, replacing the existing tags on your pages, and redeploy the updated pages to your web site.
Using First-Party Cookies Without SDC
If you use Webtrends Analytics software without SDC, you can use first-party cookies to identify visitors simply by creating a Session Tracking definition that specifies your cookie and applying it to your profiles.
To create a Session Tracking definition:
- In the left pane, click Administration > Web Analysis > Options > Session Tracking.
- Click New.
- Type a name for the definition in the Description field.
- Select Use the following alternate method(s).
- Select the Cookie check box.
- In the Track Sessions by Cookie dialog, select Use this cookie.
- Specify the name of the cookie that your web server uses to identify visitors. For example,
Webtrends_IDis the name of the cookie that the Webtrends Cookie Plug-in uses by default.
To use cookie session tracking in profiles:
- In the left pane, click Administration > Web Analysis > Reports & Profiles.
- Add or edit a profile.
- Click Analysis > Session Tracking.
- Clear the Always use default definition check box.
- Select the cookie tracking definition that you created.
- Click Save.
Implementing the Opt-Out Cookie
Because of misconceptions about the nature of cookies, some of your visitors might have concerns about how cookies that your web site generates might be used to track their Internet behavior. Using the Webtrends JavaScript, you can implement a method that allows visitors to your site to opt out of being tracked by your first-party cookie. The JavaScript supports full opt-out, in which the JavaScript does not collect data about the visit and does not set a cookie.
Implementing the full opt-out cookie involves the following high-level steps:
-
Write a policy about how your organization uses first-party cookies and post that policy on your site. For more information, see “Writing an Opt-Out Policy,” below.
-
Create a web page that allows your visitors to specify their tracking preference, and implement a method on your web site to set the full opt-out cookie,
WTLOPTOUT=1. For more information, see “Creating an Opt-Out Mechanism," below. -
Deploy a Webtrends v8 or higher JavaScript tag on your site.
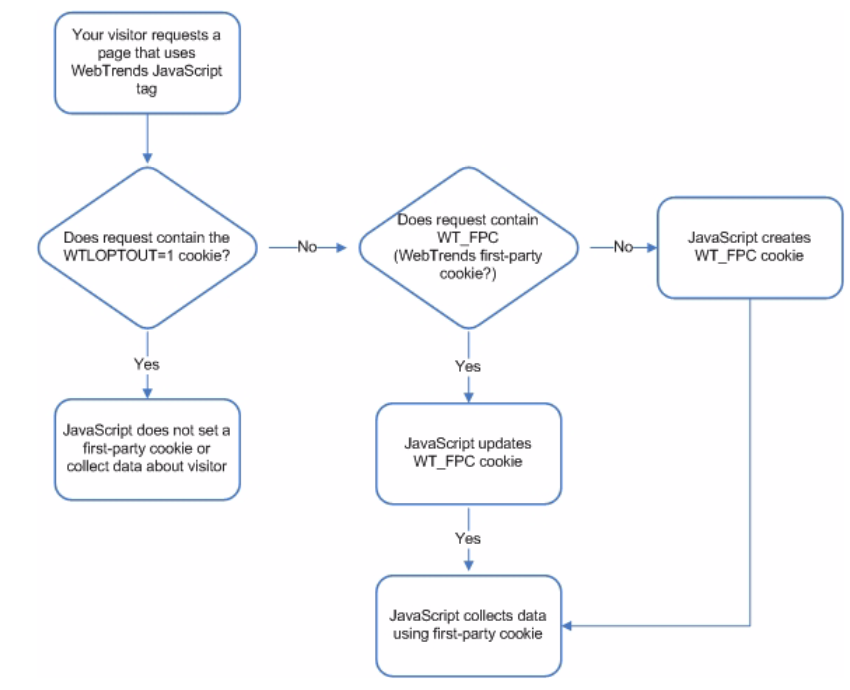
How the Opt-Out Cookie Works
After you implement the opt-out cookie on your web site, the Webtrends JavaScript tag makes sure that no data is collected about visitors who have requested full opt-out. The following graphic shows the logic involved:
Writing an Opt-Out Policy
As a best practice, you should create a policy that describes how your organization uses first-party cookies and the differences between anonymous opt-out and full opt-out. Make it clear to visitors that accepting the opt-out cookie from your web server is the mechanism from preventing your first-party tracking cookie from being set and prevents data about their activity your on your site from being collected. Cookie-wary visitors should be aware that if they delete the opt-out cookie, your web server identifies them as a new visitor and sets a first-party cookie that can be used to collect data.
You can view the opt-out language that Webtrends Inc. uses at the following URL:
http://ondemand.Webtrends.com/support/optout.asp
Creating an Opt-Out Mechanism
Your web site developer will need to implement a way to set the opt-out cookie for visitors who specify that they do not want tracked on your site. The JavaScript tag looks for a cookie named WTLOPTOUT set to a value of 1.
Because cookies are domain-specific, if you have multiple domains, you need to set the opt-out cookie for each domain. If you have multiple sub-domains, use the domain attribute in the cookie to specify the main domain. For example, ondemand.Webtrends.com is a sub-domain of webtrends.com. In order to set a cookie that is identified for both the domain and all sub-domains, the web site developer passes domain=.webtrends.com for the domain attribute as shown in the following example:
WTLOPTOUT=yes expires= Thu, 14 Jan 2016 18:40:50 UTC; path=/: domain=.Webtrends.com
The following example shows JavaScript that sets a full opt-out cookie:
<html>
<body>

<script type="text/javascript"><!--

// test for existence of WTLOPTOUT cookie
if (document.cookie.indexOf("WTLOPTOUT=")==-1) {

// compute cookie expiration
var dCur=new Date();
var dExp=new Date(dCur.getTime()+315360000000);

// initialize cookie attributes
var expiry="; expires="+dExp.toGMTString();
var path="; path=/";
var domain="; domain=.Webtrends.corp";

// WTLOPTOUT cookie does not exist so set it
document.cookie="WTLOPTOUT=1"+expiry+path+domain;
}

//-->
</script>

</body>
</html>
If you used earlier versions of Webtrends Analytics software or Webtrends Analytics On Demand, you need to generate a new JavaScript tag for each data source and update the tag on your site.
Disabling Cookies
You can configure Webtrends Analytics On Demand and SmartSource Data Collector to not set cookies if your organization’s policy does not allow visitor data to be tracked using cookies.
Disabling Third-Party Cookies
If you use first-party cookies, you may want to disable the third-party cookies that are set by Webtrends Analytics On Demand or SmartSource Data Collector. Although setting both first-party and third-party cookies may seem unnecessary, there are several reasons that you should consider using both. Webtrends uses third-party cookies for the following purposes:
- To set a new first-party cookie for returning visitors who previously were only identifiable by the third-party cookie. If you disable third-party cookie tracking, all visitors are considered new visitors until the first-party cookie is set. This only a consideration if you are upgrading from an earlier version.
- To track visitors across multiple domains.
- To identify visitors for session tracking when third-party cookie is available, but a first-party is not available.
Disabling Third-Party Cookies for Webtrends On Demand
You can prevent Webtrends On Demand from setting third-party cookies for all hits by adding the following line to the JavaScript tag:
DCS.dcscfg=1;
Disabling Third-Party Cookies for SmartSource Data CollectorYou can prevent SmartSource Data Collector (SDC) from setting third-party cookies.
- To prevent SDC from setting a third-party under any circumstance, edit the
dcs.cfgfile and set theenabledsetting in the[cookieserver]section tofalse. - To disable third-party cookies for all hits using the JavaScript tag, edit the
dcs.cfgfile and add or edit the following line:cfgbyhit=true. Also, add the following line to the JavaScript tag:DCS.dcscfg=1;.