This article is designed to help users of Webtrends Analytics understand how Campaign analysis can measure and improve visitor conversion on a Web site. Using this article you should be able to:
- Interpret Campaign reports
- Understand the steps used to set up the Campaign Drilldown reports for your Web site
- Provide your Webtrends administrator with implementation instructions
- Understand how you can customize Campaign analysis for your business needs
- Learn about the Campaign analysis features available in Webtrends
Terms Used in This Article
This document uses some Webtrends-specific terminology that may be new to you.
Campaign Drilldown
A Webtrends Analytics report feature that allows users to navigate from a highly summarized level of data to successively more detailed levels of data, organized along a concept hierarchy. Campaign Drilldown allows users to view visits, page views, revenue, average order size, and other information categorized by Campaign Partner, Demand Channel, Marketing Program, Marketing Activity, campaign Name, Campaign Creative, Campaign Offer, and other campaign attributes.
Campaign ID
A unique campaign identifier used to track campaign performance. Campaign ID is a level within the drilldown categorization scheme set up by the Webtrends administrator, which allows for reporting on campaigns in a way that is meaningful to report users.
Conversion, Conversion rate
The percentage of a group (of visits or visitors) that completed a specified action indicating customer interest. Conversion can assess any type of action a Web site wants its visitors to perform, and any type of goal or mission a visitor wants to complete on the site. For example, conversion could describe the percentage of all visits that involved a completed purchase of a product or service. Conversion can also refer to visitors who performed a very small and precise action, such as clicking on an email campaign link.
Demand Channel
One of several venues that could be used to drive traffic to a Web site, for example catalogs, email, radio, banner ads, pop-over or pop-under ads, or direct mail. Also known as Marketing Channel. Demand Channel is a level within the drilldown categorization scheme set up by the Webtrends administrator, which allows for reporting on campaigns in a way that is meaningful to report users.
Lifetime Value
The total monetary value of a visitor's past orders since tracking with persistent cookies and Visitor History began. Average Lifetime Value is the average of all the Lifetime Values of the visitors who visit the site during a reporting period.
Segmentation
Using a visitor's buying history, demographic and/or psychographic information to compare marketing and Web analytics results. Creating a report that compares visit duration of buyers and non-buyers is one example of using segmentation to analyze visitor behavior on a Web site.
Webtrends Administrator
A Webtrends user who has rights to all features and sets up various features such as campaign drilldowns.
Who Can Use Webtrends Analytics to Assess Campaign Performance?
Webtrends Analytics is a powerful tool for managing marketing campaigns if you:
- Use online advertising to attract customers to your Web site
- Use email marketing to attract and retain customers
- Work with affiliates as part of your online marketing strategy
Webtrends Analytics Campaign reports provide deep insight into campaign effectiveness by allowing you to interactively assess ROI not only for individual campaigns but for demand channels, advertisements, creative elements, and other highly granular attributes of your online marketing efforts. Using drilldown reports and report queries, you can easily navigate to areas of concern, creating and exporting highly focused reports on the fly. Webtrends Visitor History segmentation provides even more powerful campaign tracking by linking your campaign results across visits, allowing you to correlate visitor behavior over time with demographic data. Finally, you can supplement the information in Webtrends Analytics campaign reports by using Webtrends Scenario Analysis and Path Analysis to look more closely at specific visitor behaviors, page by page, for a complete picture of how users respond to campaigns.
Webtrends Analytics campaign reports can answer questions like these:
- Did email campaigns or off-site banner ads drive more traffic to my Web site?
- Which marketing initiatives brought in the greatest ROI?
- Is paid search engine advertising attracting more users, or is organic search actually more effective?
- Are my campaigns resulting in actual customer conversions after the initial site visit?
Campaign Reports
The most effective way to track campaigns with Webtrends Analytics is to generate the full set of Campaign reports. Campaign reports compile data about each element of your marketing campaigns in a highly navigable interactive report format. The examples in this section rely on the Zedesco sample reports you can download to your Webtrends Analytics installation.
The Campaigns Dashboard
Most enterprise-level businesses run simultaneous campaigns in several locations or media. To begin with, you probably want to know which of these campaigns has been the most successful. A good place to start for an overview of campaign success is the Campaigns dashboard. You can open the Campaigns Dashboard report by opening the Sample: Zedesco report and clicking Marketing > Campaigns > Campaigns Dashboard in the left pane.
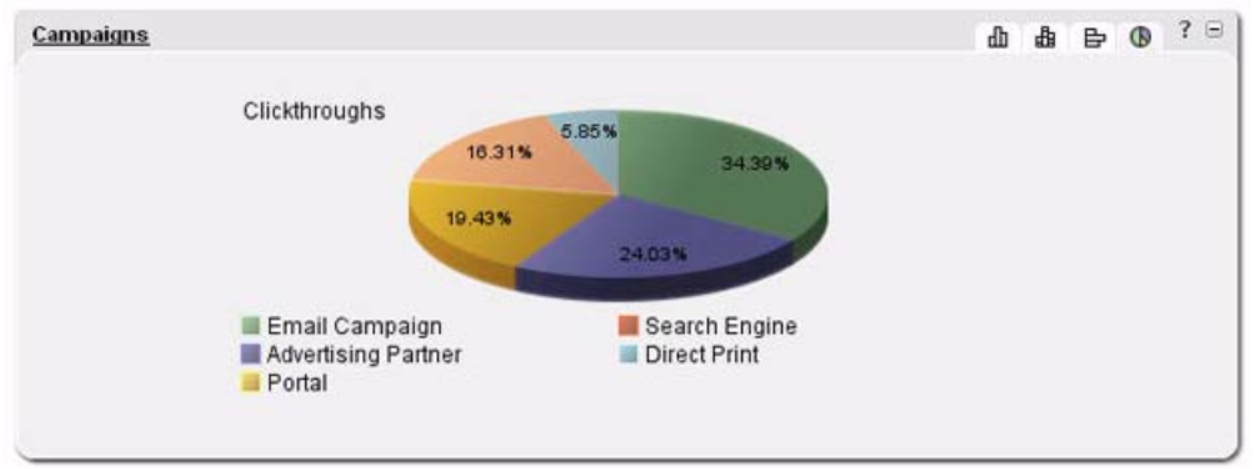
The Campaigns dashboard shows you an expandable snapshot of several kinds of report data. For example, the following graphic shows a breakdown of campaign clickthroughs by demand channel. You can see from the graphic that the Email Campaign demand channel comprised a larger share of clickthroughs than any other demand channel during the reporting period.
However, you probably have other questions about how to interpret this data. For example, you probably want to know whether all email campaigns were equally successful, or whether one particular campaign accounted for most of the clickthroughs. If your site is a commerce site, you are almost certainly interested in which of those clickthroughs led to sales, and how much revenue you realized from each demand channel. You might want to know whether visitors who responded to a campaign by placing an order were new buyers, or repeat buyers. You might even wonder which banner graphics drew the most affiliate clickthroughs to your site.
The Campaigns Drilldown Report
To get more answers about campaign success, click the Campaigns link at the top of the graph (or click Marketing > Campaigns > Campaigns in the left report pane) to open the Campaigns Drilldown report. At the top level, the Campaigns Drilldown shows statistics about each campaign demand channel, but the drilldown functionality provides a collapsible, hierarchical view of the Partners, Marketing Programs, Marketing Activities, Campaign Descriptions, and Campaign IDs associated with each demand channel. This means you can dig deeper into each level to effortlessly compare data for different marketing efforts.
The following graphic shows the Campaigns drilldown report with some of the Demand Channel levels expanded.
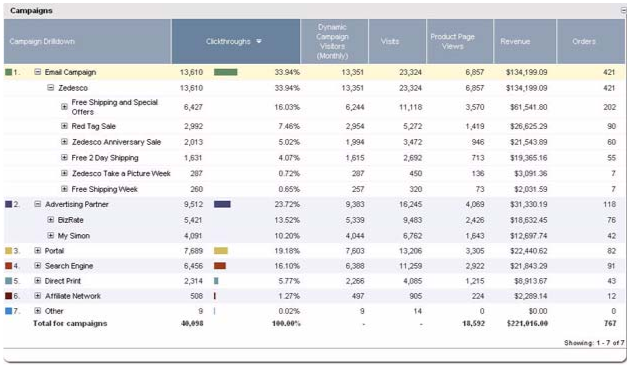
The gross clickthrough count for different demand channels shows that Email Campaigns brought in by far the highest number of clickthroughs. However, digging deeper into both Email Campaigns and Advertising Partners shows that a single Email Campaign Marketing Program, Free Shipping and Special Offers, brought in more than twice as many clickthroughs as the second most popular email offer. When you compare the results for each individual Advertising Partner to the other email Marketing Programs, both for clickthroughs, revenue, and orders, it's clear that while the Free Shipping program got great results, non-email demand channels are in general achieving results comparable to email.
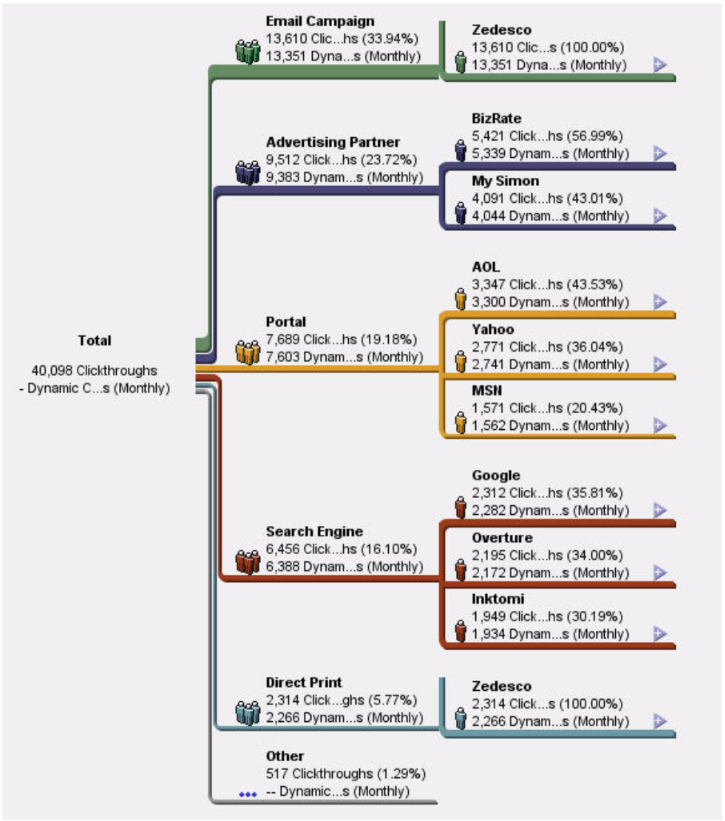
Campaign drilldown reports also provide a graphical representation of your data. Note that the first measure column in this report is Clickthroughs, and that the graphical view of the data (shown in the following graphic) breaks down the data by number of clickthroughs.
To see a graphic that shows data in terms of a different measure, such as Visits or Orders, simply click the + sign at the top of the first report column and select the measure you prefer.
Drilling Down Further
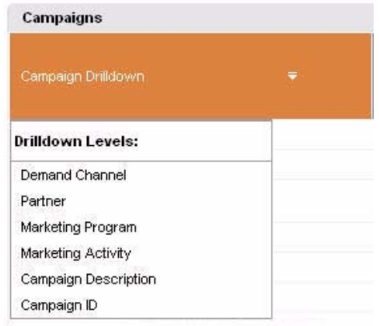
You can leverage the drilldown capability of the Campaigns report to investigate campaign success at a high level of granularity. To review the information shown in your report, click the arrow icon at the left of the report table. The following graphic shows the levels included in the default Campaigns report.
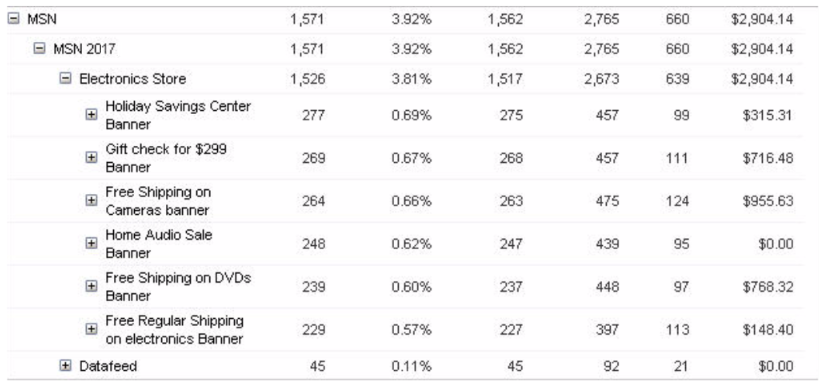
Drilling down to the Campaign Description level allows you to compare very specific information about which offers got the most visits and the highest revenue. For example, the following graphic shows how you can drill down to compare the effectiveness of different MSN banner ads.
Querying a Drilldown Report
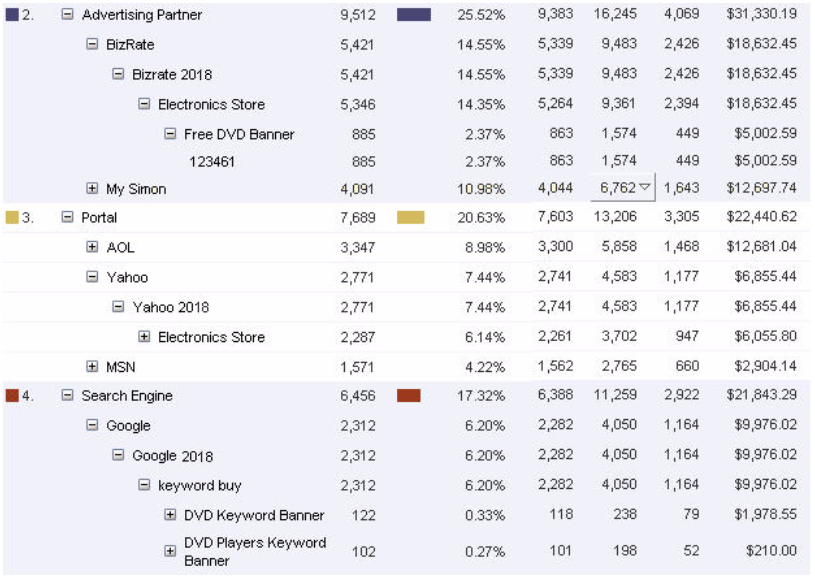
Suppose you want to compare how well different offers converted customers to purchase DVDs and DVD accessories. Creating a custom query can help you navigate the large amount of information in a report and focus on only a specific range of results. After you use a query to narrow down the report data, you can export the filtered report for later distribution.
Queries can be as simple or complex as your requirements. In the following example, we used the query Campaign Description = *DVD* to request all the results at the Campaign Description level that included the word DVD. The following graphic shows the results of the query for several different types of campaigns.
Campaign Segment Reports
You may want to know more about your campaign success within specific market segments. Because Webtrends Analytics is especially powerful for correlating data over time, we also provide campaign tracking reports that focus on differentiating particular market segments.
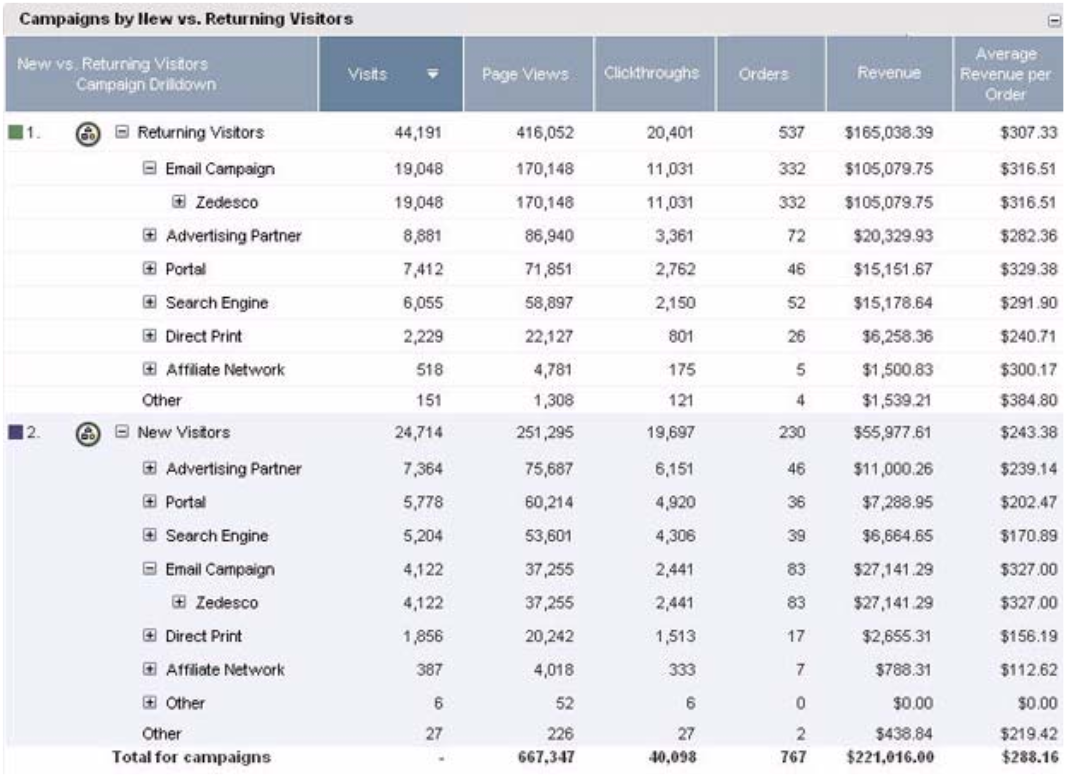
For an example of how visitor segmentation can provide crucial information about campaign conversions, expand Marketing > Campaigns > Segments in the left pane of Webtrends Analytics Reports and select the Campaigns by New Vs. Returning Visitors report.
As shown in the following graphic, New Vs. Returning Visitors is a drilldown report. By expanding the Email Campaign section of both the Returning and New Visitor section, you can see that Returning visitors brought in dramatically more revenue than New visitors.
Webtrends Analytics also provides Segmentation reports that allow you to compare other demographic segments, including first-time versus repeat buyers, Lifetime Value, and geographic location. Webtrends customers who license Custom Reporting can also define their own custom segments to create campaign reports for further comparison.
To view the sample Campaigns reports, you should install the Zedesco Sample report. This sample includes a profile with all the standard Campaign reports. However, it does not include log files, so you cannot modify or reanalyze the profile.
Accessing Sample Data
To look at the sample Campaigns reports, we recommend using Webtrends Analytics sample data. Looking at sample data can help you understand the examples provided in this document and provide ideas for designing your own Campaigns reports.
If you have not already done so, install the sample data.
To install the sample:
- Log in to Webtrends.
- In the left pane, click Administration > Install Components.
- Click Accessories.
- Click Sample Downloads.
- Select the Zedesco Sample.
- Click Save.
- Install the sample.
Viewing Sample Reports
To view sample reports:
- In the left pane, click Administration > Web Analysis > Reports & Profiles.
- Mouse over the sample: Zedesco profile and click View Reports on the Action menu. Webtrends Analytics Reports opens, showing the sample report.
- In the left pane of the report, expand Marketing > Campaigns and select a Campaigns report from the list.
:::(Internal) (your title goes here)
I wanted to separate below from the sample report information above so it was clear that this was about the real thing and not a continuation of the instructions for the sample report. I inserted "your" in the title after playing around with visual separators which didn't look quite right.
sw
:::
Preparing for Your Campaign Report Setup
Use the following steps to get ready before setting up campaign reporting:
-
If you will use Webtrends query parameters to identify your campaigns, decide on a unique Campaign ID for each campaign you want to track. Campaign IDs are strings that can include text, numbers, or both text and numbers. If you plan to export your campaign reports as SmartReports, you should consider using text or a combination of numbers and text to avoid problems with number auto-formatting in Microsoft Excel.
-
Decide what campaign attributes you want to use in drilldowns, such as Demand Channels, Creative Types, Creatives, and other attributes that will be expressed as dimensions in the drilldown report. You will provide information about these attributes in the campaigns.csv translation file.
-
Determine what technology you will use to identify campaigns that bring visitors to your site. While you can define campaigns in the user interface, we recommend using Webtrends query parameters either as part of the URL or as part of a JavaScript tagging scheme with Webtrends Analytics On Demand or SmartSource Data Collector.
-
Decide what additional data you want Webtrends Analytics to analyze in your reports. Campaign reports automatically track clickthroughs, visits, and page views. If you want your campaign reports to track additional information such as orders and revenue, you should use Webtrends parameters on the pages of your site where this information is submitted. If you have already set up your site using the Webtrends parameters that track purchases, you do not need to add additional parameters.
The following parameters are used to collect information about orders and revenue:
WT.tx_s
Defines the total cost for each product in an order
WT.tx_u
Defines the number of units purchased
WT.pn_sku
Defines the product tracking number for an orderThe Email Campaigns report also requires the
WT.mc_evparameter, which identifies email opens. -
Tag your site with the parameters you have decided to track.
Campaign Report Setup
This section provides information about the steps you need to use the campaign drilldown reports included in Webtrends Analytics. The following steps provide an overview, and the individual steps are described in detail below.
To set up Webtrends Analytics Campaign Drilldown reports:
-
Tag your site or URL with the
WT.mc_idparameter and any other parameters you want to use to collect information. If you have not already set up your site with the correct parameters for collecting order and revenue information, for example, you may also want to add these parameters for the most complete reporting. For more information, see "Tag Your Site with Webtrends Parameters," below. -
Create a profile using the Marketing Report Pack, which includes all the relevant campaign reports, or enable individual campaign reports in both the Reports dialog box of your profile settings and in your report template. The Complete View template contains all the relevant reports.
-
Enable Visitor History for each profile you use to track campaigns, and decide how long you want to attribute data to each campaign identified by
WT.mc_id. For more information, see “Enable Visitor History for Profiles That Track Campaigns,” below.NoteIf you enabled campaign reports by enabling the Marketing Report Pack, the appropriate Visitor History categories are enabled automatically.
-
Customize the Campaign Drilldown CSV file. For more information, see "Customize the Campaign Drilldown CSV File," below.
-
If you want to change the levels in the main Campaigns drilldown report, copy and modify the Most Recent Campaign (drilldown) dimension. Then copy and modify any reports that use the Most Recent Campaign (drilldown) dimension so that they use the new version of this dimension. Then modify your templates and profiles so that they use the new version of the report(s).
NoteYou can only change the levels in the drilldown reports (or any other custom reports) if you license Custom Reporting. If you license the Marketing Report Pack, you can use any of the Campaigns custom reports as is. Drilldown levels for which the translation file includes no data are displayed as None in reports.
Tag Your Site with Webtrends Parameters
The WT.mc_id parameter identifies clickthroughs to the campaign you want to track. If you use Webtrends SmartSource Data Collector (SDC) or Webtrends On Demand, add this parameter to the META tags on the Web page you want to tag. If you do not use SDC or Webtrends On Demand to collect Web activity data, you can instead pass the WT.mc_id parameter as part of the page URL.
Where you decide to place the WT.mc_id parameter depends on your site configuration as well as the kind of campaign you are tracking. One solution is to place the WT.mc_id parameter on each campaign's landing page, creating a redirect to the home page if necessary. However, you can also place the parameter in the URL of a link on the referring page or within an HTML-formatted email. For example, when placing a campaign on an external site, you can attach the parameter to the URL as shown in the following example:
http://www.mydomain.com/product.htm?WT.mc_id=mycampaignid
Using the WT.mc_id parameter this way eliminates the need to develop unique landing pages for each campaign. You can have multiple campaigns leading visitors to one landing page, but Webtrends Analytics will use the WT.mc_id parameter to differentiate where individual visits are coming from.
Typically, email campaigns, affiliate campaigns, and paid search campaigns are tagged using the referring URL. Other campaign types, such as radio or print campaigns may require you to specify a unique landing page, because they rely on the user to type the URL in a browser window. However, your campaign and site design should determine the parameter placement.
Tracking Campaigns Without Using Parameters
It is possible to track campaigns without using parameters using legacy functionality. To create campaign reports without using the WT.mc_id parameter, you can use Webtrends Analytics Administration to define campaigns by specifying the URL of the landing page or referring page. You can then create Custom Reports using the Campaign (V6) and Campaign Type (V6) standard dimensions. You can also create the Same Visit Campaign ID and Same Visit Campaign Name reports. However, you cannot use campaigns configured through Administration to create Campaign Drilldown reports or Segments reports, or to track campaign history. These reports rely on functionality introduced in v7.x.
Enable Visitor History for Profiles That Track Campaigns
Webtrends Analytics campaign reports rely on Visitor History to associate a visitor's behavior with the visitor's access to a campaign. For example, if a visitor requests the landing page for an advertising campaign, you know the visitor has seen the advertisement and clicked through to your Web site. But when the same visitor returns to the site the next day and makes a purchase, how does Webtrends Analytics know to attribute the purchase to the campaign? Visitor History makes this information available by connecting information about visitor activity over time. When you identify your campaigns with the WT.mc_id parameter, Webtrends Analytics automatically generates the WT.vr.rac parameter for subsequent hits within the visit. Webtrends Analytics converts WT.vr.rac into a series of campaign-specific parameters that in turn provide the data for campaign drilldown reports.
Visitor History requires that visitors be "strongly" identified using a session tracking method other than IP address and user agent.
Visitor History also allows you to make campaigns expire after a set number of days. By default, reports credit site activity to the most recent campaign identified by the WT.mc_id parameter. In other words, a campaign does not expire until a new value for is WT.mc_id passed. However, you can choose to attribute activity to each campaign for a limited time. For example, if you use short-term, targeted campaigns, you may only want your reports to show hits and visits attributed to each campaign for 7 days after it launches.
To enable Visitor History for Campaigns reports:
- Create a profile, enabling the Advanced Profile Options in the profile wizard.
- In the Summary dialog, click Additional Options.
- Click Advanced > Visitor History.
- Select the Enable Visitor History check box.
- Under Behavior Categories, select the Campaign History check box.
- If you want to ensure that campaigns never expire, and all activity will be credited to the most recent campaign until a new campaign is launched, click Attribute all activity to the Most Recent Campaign.
- If you want activity to be credited to each campaign for a limited time, click Attribute activity to the Most Recent Campaign for and type the number of days in the text box. Choosing this option ensures that campaigns expire after the specified length of time.
- Enable any other Visitor History features relevant to your analysis. For example, enable Search Engine history to collect information about search engine-generated visits.
Customize the Campaign Drilldown CSV File
To implement the powerful drilldown feature for Campaigns reporting, Webtrends Analytics uses the campaigns.csv file. For software users, this file resides in the installation directory\storage\config\wtm_wtx\datfiles\datasources directory. The information in this translation file identifies the following information for each campaign:
- Campaign ID
- Description
- Creative
- Creative Type
- Demand Channel
- Marketing Activity
- Marketing Program
- Offer
- Partner
- Placement
For example, the following sample line from campaigns.csv provides Webtrends Analytics with information about the Free DVD Banner campaign.
123461,Free DVD Banner,Banner Ad,100 x 160 Image,Advertising Partner,Electronics Store,Bizrate 2003,Free DVD,BizRate,Right Frame
For this campaign, Campaign ID=123461, Creative=Banner Ad, Creative Type=100 x 160 Image, Demand Channel=Advertising Partner, and so on.
By default, this file contains data customized for the Zedesco Web site samples provided with Webtrends Analytics. To create campaign drilldown reports customized for your Web site, edit this file to provide information about each of your own campaigns. When you provide this information for your campaigns, you provide the information Webtrends Analytics uses to track these categories using Visitor History and to build tables with multiple levels. If you use Webtrends Analytics software, you can simply edit the existing campaigns.csv file or replace it with your own customized version, using the same number of columns in the same order and substituting commas for columns for which you do not include data. For detailed information about how to do this, see "Editing the campaigns.csv File," below. If you use Webtrends Analytics On Demand, you should contact Webtrends Support to have your own file uploaded and implemented.
By default, all profiles use the same campaigns.csv file. If you need to use multiple versions of this file for different profiles, see "Using Multiple Translation Files for Campaigns," below.
It is technically possible to create Campaign reports based on a translation file that uses different dimension columns or a different order of dimensions than those used in the default campaigns.csv file. However, with this method, translation occurs once for each corresponding dimension in each report, rather than only once during Visitor History processing. The number of lookups required to create the drilldowns is thus much larger, and increases dramatically with any increase in the number of drilldown reports or in the size of the translation file. Because of the potential performance and scalability problems associated with these extra lookups, we recommend using only the methods described in this document to modify campaign translation files.
Editing the campaigns.csv File
You can edit the campaigns.csv file in different ways, depending on your Webtrends Analytics license and your reporting goals.
If you want to edit the rows in the file to modify the information about each campaign, without changing the dimensions included, you can simply edit it as a Microsoft Excel file, adding your own data to each existing column, and save it. Omit the data in any columns you will not use, but do not remove the heading. This is the easiest way to modify the campaigns.csvfile, and does not require any additional configuration of custom reports or dimensions. Users who have not licensed Custom Reporting can use this method to generate the full set of Campaigns reports. However, if you leave some columns blank, the corresponding reports may contain columns with no data.
If you want to change the dimensions that are included in your Campaigns report, you can edit the heading row.
To edit the dimensions included in Campaigns reports:
-
Navigate to the
installation directory\storage\config\wtm_wtx\datfiles\datasourcesdirectory. -
Create a backup copy of the
campaigns.csvfile and rename it. -
Edit the
campaigns.csvfile by deleting any dimensions in the heading row that you do not want to include in your Campaigns reports. For example, if you want to eliminate the Marketing Activity, Marketing Program, Partner, and Placement dimensions, edit the standard heading row:CampaignID,Description,Creative,Creative Type,Demand Channel,Marketing Activity,Marketing Program,Offer,Partner,Placementso it reads as follows:
CampaignID,Description,Creative,Creative Type,Demand Channel,,,Offer,,
Do not delete any of the commas that delimit the fields. Do not re-order the columns in the file. Deleting the comma delimiters or reordering the fields will result in an incomplete analysis or inaccurate data.
-
Make a copy of the Most Recent Campaign (drilldown) dimension and edit it to remove the levels you removed from the translation file.
-
Make a copy of the Campaigns custom report and edit it to use the new version of the Most Recent Campaign (drilldown) dimension.
-
Do the same for other reports that use the Most Recent Campaign (drilldown) dimension. Preconfigured custom reports that rely on this drilldown dimension include:
- Campaigns by Countries
- Campaigns by DMA
- Campaigns by New vs. Repeat Buyers
- Campaigns by New vs. Returning Visitors
- Campaigns by Regions
- Campaigns by Time
- Creative Types
- Creatives
- Offers
-
Click Web Analysis > Report Designer > Templates, edit the report template, and click Content to add the new reports to the report template.
-
In your report profile settings, click Advanced > Reports and enable the new versions of the Campaigns custom report(s).
Using Multiple Translation Files for Campaigns
By default, all profiles point to the same campaigns and products translation files. However, you may have multiple profiles with different translation needs.
To specify a different translation file for each profile:
-
Open
wtm_wtx.iniin a text editor. By default, it is stored in theWebtrends installation directory\storage\config\wtm_wtxdirectory. -
Copy the text from
[wtt]to the end of the[wtt2]section. -
Open the profile file for the profile whose data is to be translated in a text editor and paste in the copied text.
NoteBy default, profile files are stored in the Webtrends installation directory\storage\config\wtm_wtx\datfiles\profiles directory and have a .wlp extension. The profile file name is listed in the General dialog box for the profile. For example, if the Profile File Name for your profile is owVSmUxuvL5, it will be listed in the profiles directory as owVSmUxuvL5.wlp.
-
In the profile file, directly under
[wtt]add the following line:
overrideglobal = 1.
This tells Webtrends Analytics to use the translation file you specify for this profile.
-
Under
[wtt1], locate the following line:
filename = .\wtm_wtx\datfiles\datasources\Campaigns.csv
and replace the file nameCampaigns.csvwith the name of the translation file you want to use for this profile. -
Copy the translation file specified in Step 5 into the
.\wtm_wtx\datfiles\datasourcesdirectory. -
Repeat these steps for every profile that uses a translation file.
Customizing Webtrends Analytics Campaign Reports
To address specific reporting needs for your Web site, you may want to add some special features to your campaign reports. For example, you may want to find out how well your campaigns are attracting visitors to perform various site-critical actions such as registrations or information searches. You may have specialized email campaign reporting needs. Or you may need to evaluate the impact of paid and unpaid search engine searches on campaign conversion. The following sections provide some suggestions for getting the kind of data you need.
Several of the customizations described in the following sections rely on Webtrends Custom Reports. If you license Custom Reporting, you can freely create or customize Custom Reports, for example by designing your own Scenarios. If you have licensed the Marketing Report Pack, you can use Marketing Custom Reports based on preconfigured elements, such as the Campaigns Purchase Conversion Funnel report, but you cannot modify them or create new ones. For more information about Webtrends licensing, see the Webtrends Implementation and Maintenance Guide.
Adding Scenario Analysis to Campaigns Reporting
To get a closer look at the specific page sequences that result in campaign conversion, you may want to create a campaign scenario. Scenario analysis focuses closely on how well visitors are completing predetermined sequences like purchases, registrations, or shopping cart additions. For example, you may want to create a scenario that examines how many users navigate from the landing page to view a particular product and then add it to a shopping cart. You can then use the Webtrends Custom Reports settings to create reports that group these scenario results by Campaign ID, allowing for easy comparison of how effectively each campaign resulted in user conversion. These reports use the Campaign ID as the primary dimension (that is, the first column in the report) and the scenario funnel as the secondary dimension.
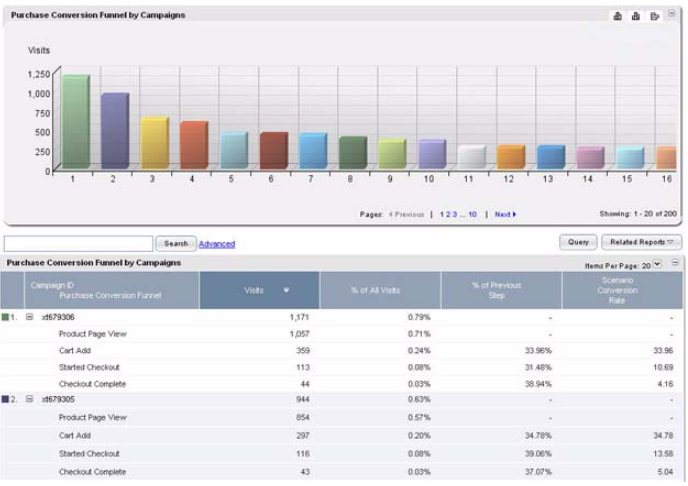
For example, the standard campaign scenario report (included in the Zedesco sample and the Complete template) is the Purchase Conversion Funnel by Campaigns, which shows how the visitors who responded to each campaign moved through a purchase scenario from the product page to the checkout page. As shown in the following graphic, the Purchase Conversion Funnel by Campaigns provides a graphical overview of campaign visits, and then compares the number of visitors to each campaign to the number of campaign visitors who actually completed each step in the scenario. It also provides overall scenario conversion rates for visitors to each campaign.
To configure a custom Campaign Scenario report:
-
Configure a scenario, or modify one of the existing scenario funnels configured in Webtrends. To create or modify a scenario, click Administration > Web Analysis > Report Configuration > Scenario Analysis in the left pane. You can configure a scenario by specifying either the URLs of each step or the META tags used to identify each scenario step on your web site. For more information and detailed instructions, click the Help icon.
-
Click Administration > Web Analysis > Report Configuration > Custom Reports in the left pane.
-
Copy and modify the Purchase Conversion Funnel by Campaigns report, or create a new custom report that uses the following settings:
In the Dimensions dialog, choose the following settings:
| Primary Dimension | Most Recent Campaign ID |
|---|---|
| Column Name (for Primary Dimension) | %%CD_Campaign_ID%% |
| Secondary Dimension | Your conversion funnel |
| Exclude Default Strings | Enabled |
In the Measures dialog, use the following measures:
- Visits
- Percent of All Visits
- Percent of Previous Scenario Step Visits
- Percent of First Scenario Step Visits.
Disable column totals for each measure.
Tracking Paid Search Campaigns Versus Organic Searches
Webtrends Analytics Paid and Organic Search Engine reports allow you to compare paid search placements with search engine traffic acquired through customer-driven searches. To ensure you can accurately differentiate traffic from paid placements from organic traffic, use the WT.srch=1 parameter in the URL from the referring search engine for all paid searches. This parameter always has a value of 1. Organic searches do not include this parameter in the URL. Note that Search Engine Campaign results are displayed in the Marketing > Search Engines section of the Webtrends Analytics Complete template, not in the Campaigns section.
Search engine results using WT.srch=1 are limited to only those search engines that are listed on the Webtrends search engine availability list. Using WT.srch=1 will not produce search engine campaign results for search engines that are not recognized by Webtrends.
Tracking Email Campaigns
If you need more powerful analysis of email campaigns, Webtrends Analytics can provide specialized reporting that tracks visitor behavior from the initial email open to Web site clickthrough. Tag your email creative with Webtrends query parameters to track email opens and other behavior that occurs on your Web site.
Making Report Information More Meaningful
Depending on how your Web server logs information, you may see labels in your reports that are not immediately meaningful. For example, your data may include information such as campaign IDs, SKU numbers, or product tracking codes. To translate these values into terms that can be understood by anyone reviewing your report, you can associate a translation file with a custom report dimension. This translation file can be a comma-, space-, or tab-delimited CSV file. You can also specify an Oracle or Microsoft SQL Server database as a source for data translations. These translation files are separate from the campaigns.csv translation file used to create drilldown reports. Webtrends Analytics On Demand customers also may utilize this functionality through a billable Translation File Management service. Contact your Sales Representative or Webtrends Support to have your own file uploaded and implemented.
Keep in mind the following tips when setting up a translation file:
- For best performance, the translation file should be saved locally to the Webtrends Analytics analysis computer.
- If you are using a database as the translation source, you need to have either the Oracle OCI client or ODBC config installed on the Webtrends Analytics analysis computer.
- Make sure to avoid duplicate entries in a translation file or database table. Webtrends Analytics uses the first entry it finds to perform a translation.
- You should update the translation source periodically to ensure that it contains the most recent data.