
To ensure you the highest degree of success with your upgrade to Webtrends Analytics 9.2b and to help you expedite recovery if anything should go wrong, we have outlined tasks which are critical to a successful upgrade. Skipping any of these tasks may result in a failed upgrade and cause difficulty in recovering from that failure. If you experience any issues with your upgrade or have any questions on the tasks outlined below, please contact Technical Support for assistance.
Please note that upgrading to Webtrends Analytics 9.2d can only be performed from versions 9.2x. Any earlier version must first be upgraded to 9.2x before proceeding with the upgrade to 9.2d. Please contact Technical Support for assistance.
9.2d is only supported on Windows Server 2008 R2 or Windows Server 2012.
Make a complete backup of the Webtrends install
Make a backup of the Webtrends storage folder:
- Stop all running jobs.
- Stop all Webtrends services.
- Stop the Microsoft SQL database services.
- Backup the following directories: \Webtrends\Storage\
- Restart all Microsoft SQL database and Webtrends services.
Please note that Profile backups can take a significant amount of storage space.
If all profiles are in good working order and validated to meet the needs of the
business users it may not be necessary to retain the profile backups. If it is
determined that profile backups do not need to be maintained, the
\Webtrends\Storage\Backup\ directory can be excluded from step 4, but all other
folders must be backed up (Analysis, Reports, and Config).
Backup the wt_sched and wtmaster databases
You can use Microsoft SQL Studio Express to back up the data bases or you can back them up from the command line. You can download and install Microsoft SQL Server Management
Studio Express from the Microsoft web site. This application provides a graphical user
interface though which a backup of the database can be performed.
To create a backup of the system database using Microsoft SQL Server Management Studio perform the following steps:
- Connect to the system database using either the specific account credentials provided at
the time the database was installed, or else connect using Windows domain
authentication. - Expand Databases, right-click on wt_sched and select Tasks > Back Up... from the
context menu. - Under the Source section, ensure the database is wt_sched and that the backup type is
"Full." - Under "Backup set" provide a name, description, and expiration date as necessary.
- Select "Add..." under the Destination section and designate the file name and path to
which the backup will be saved. It may be necessary to select the "Overwrite all
existing backup sets" option in the Options section if a backup already exists and is to be
overwritten.
Repeat the above steps 2 through 5 for the wtMaster section of the database.
Alternatively, the sqlcmd utility can be used. Open a command line window and navigate to
the sqlcmd subdirectory in the Microsoft SQL Server installation directory. By default, sqlcmd is located in the C:\Program Files\Microsoft SQL Server\XX\Tools\Binn directory (XX will vary depending on the version of SQL Studio you are using).
Type the following commands, in sequence, excluding the [bracketed text]:
- SQLCMD
- BACKUP DATABASE wt_sched
- TO DISK = '
\wt_sched.bak' [where is the fully qualified path to the directory where the backup will be created.] - WITH FORMAT;
- GO
- SQLCMD
- BACKUP DATABASE wtMaster
- TO DISK = '
\wtMaster.bak' [where is the fully qualified
path to the directory where the backup will be created.] - WITH FORMAT;
- GO
Check system specifications
Verify that the server meets the minimum recommended system specifications for the install
type.
Download all required install packages
Contact Technical Support to get the applicable files needed for installation. If the install plans include installing the GeoTrends component, please let us know of the need for the GeoTrends data file.
Verify the server has all the associated applications and roles installed
The following is a list of tasks for the installation. The initial procedures can be performed in any order; however, all steps must be completed before running the installer.
If your environment requires a "hardened" server configuration for maximum security, you should implement the security hardening measures after the installation is complete.
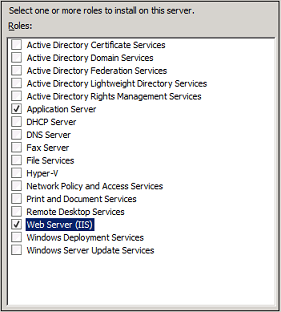
Add Roles
-
Start the Server Manager.
-
Click Roles and select Add Roles. (Click Next in the Before You Begin dialog if it appears.)
-
In the Select Server Roles dialog, add Application Server and Web Server (IIS), adding any required features if prompted, and click Next.
-
Click Next on the Application Server dialog.
-
Click Next.
-
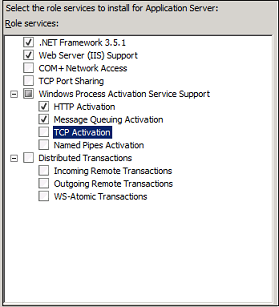
Add the Application Server Role Service Web Server (IIS) Support, adding any required features if prompted.
-
Add Message Queuing Activation under the Windows Process Activation Service Support, adding any required features if prompted, and click Next.
-
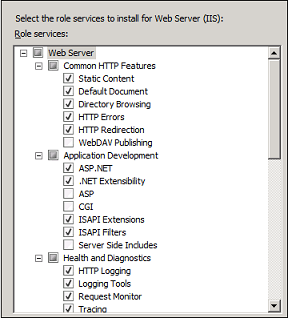
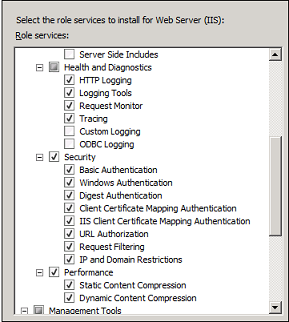
Click Next in the Web Server (IIS) dialog.
-
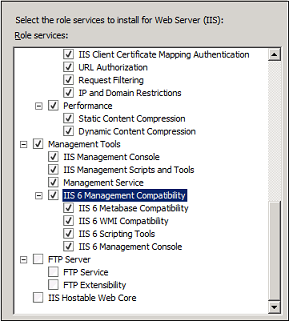
Scroll down in the role services dialog and add IIS 6 Management Compatibility (subcomponents are automatically selected), adding any required features if prompted.
-
Click Next.
-
Click Install. After a few minutes, the Installation Results screen appears.
-
Click Close.
Add Service Accounts
Webtrends requires a domain user account to run services. Local user accounts do not allow the installation of Webtrends on any distributed machines, which includes additional options such as analysis machines, Insight, Realtime Engine, etc.
Open the local security policies: Administrative Tools/Local Security Policy.
The Local Security Policy window opens.
- Navigate to Local Policies > User Rights Assignment.
- Add the service account to the following local security policies (regardless of whether the user already belongs to existing groups in these policies).
- Act as part of the operating system
- Allow log on locally
- Debug programs
- Log on as a service
Add the service account to the Local Administrators group:
- Open the Server Manager.
- Navigate to Local Users and Groups/Groups.
- Add the service account to the Administrators group.
Turn off User Account Control (UAC)
User Account Control must be disabled to install Webtrends Analytics. If you do not disable UAC, the installation fails and returns an error code (1001, 1603) or a message about account restrictions.
- Open Control Panel.
- Click User Accounts.
- Click User Accounts.
- Click Change User Account Control Settings.
- Drag the slider bar to Never Notify.
- Click OK.
- Run Windows Update to get the latest patches for the installed components.
After changing these settings, the computer must be restarted before starting the Webtrends installer. If the installer complains about UAC still being on after completing the steps above, you may have to turn off UAC via the registry.
Run the Analytics Installer
- Log in as the Service Account user created in Add Service Accounts.
- Right-click on the installation file and select Run as administrator.
- Select the drive and location to extract the installer to, this should be your installation drive.
- You must run the installer from a command line. Open a Command Prompt window and locate the Webtrends Setup directory you created in the previous step. Run the following command: setup.exe SKIP_BETAS.
- Accept the license agreement and click Next.
- Validate the prompts as provided in the upgrade process.
- Validate the installation:
- Click the Webtrends On Premises desktop icon. The login dialog opens.
- Type the installing user name and password and click Log in. If licensing information was not provided during the installation, you are prompted to activate your license.