Webtrends provides a highly configurable array of user rights and roles to help you set up user access that reflects your organizational security model. Depending on your organizational structure, you may find that you want to provide varying levels of access to different features and objects within Webtrends.
This article describes how to create users and assign user rights to various features of Webtrends. At the most basic level, creating a user grants access to a Webtrends login. However, by selecting specific rights for each user, you can define very specific and detailed user rights according to each user’s job function and data access requirements. If you have more than a handful of Webtrends users, you can reduce configuration time using groups of rights called roles. Instead of repeatedly defining many individual rights for each user, you can streamline rights assignment by assigning each new or existing user a role.
Understanding Webtrends User Rights
When you configure rights for a user or role, Webtrends provides three different types of rights: action rights, profile rights, and template rights. Selecting these rights defines the permissions granted to a user or role. Action rights are designed to control access to functionality. Profile and template rights provide access to the data and reports contained in specific profiles and templates.
Webtrends user rights are cumulative, and greater rights grant implied access to lesser ones. For example, granting Create rights also grants View, Edit, and Delete rights. Similarly, if you have only View rights to all profiles through the Action Rights dialog, you can still be granted Edit rights to any specific profile in the Profile Rights dialog.
Action Rights
Action rights are Create, View, Edit, and Delete rights to specific Webtrends features and functionality. (These rights were known as User Rights in previous versions.)
Action rights can provide different levels of functionality to users or groups of users. For example, users in your organization who primarily use Webtrends to view reports or schedule report exports probably do not need rights to manage users, set system options, and perform administrative functions. By providing users only with the rights they need, you can ensure that your configuration is secure and your report users do not become confused by too many configuration options.
Profile and Template Rights
Profile and Template rights are Create, View, Edit, and Delete rights to individual profiles and templates within Webtrends. Profile and Template rights can provide better security and more targeted report content. In cases where different users and roles should not see the same data, you can use these rights to determine which profile data users can access and the number and arrangements of the reports they see. For example, Webtrends users who provide third-party reporting services often use profile rights to make sure each company only has access to its own data. Similarly, you can limit template rights to make only certain groups of reports visible to each user or role. For example, if you only want to provide Search reports to your Search Marketing group, you can create a template that contains only those reports and grant template rights to each user in the group. Alternately, you can create a Search Marketing role that has those rights and assign it to all users in the group.
Granting access to all profiles or all templates listed in the Profiles Rights and Template Rights dialogs does not also grant access to newly created profiles and templates. To grant rights to all current and future templates and profiles, use the Profiles and Templates rights in the Action Rights dialog.
Understanding Webtrends User Roles
User roles are predefined sets of user rights that you can apply to more than one user. If you have multiple users who need the same permissions, you can avoid recreating the same rights for each user by creating a role. Then assign the same role to each user by selecting the role in the General dialog of the User settings.
Configuring User Roles
To create a user role:
-
In the left pane, click Administration > Application Settings > User Management > Roles. A list of the current users roles opens.
-
Click New.
-
Specify a name for the role. For example, you could name a role based on a job function such as Accounting, a third-party company name, or a role within Webtrends such as “Report Scheduler.” Click Next.
-
In the Action Rights dialog, set rights to functionality for this user. For more information about Action rights, see “Action Rights,” above. Click Next.
-
In the Profile Rights dialog, set rights to specific report profiles for this user. For more information, see “Profile and Template Rights," above.
-
In the Template Rights dialog, set rights to specific report templates for this user. For more information, see “Profile and Template Rights,” above.
Applying Preconfigured Roles to Existing Users
User roles overwrite any existing rights for each user. If you have existing users and want to migrate them to use roles, you can edit each user and select a role in the General dialog.
After you assign a role to an existing user and click Save, you cannot recover any previous user rights settings associated with that user. Because Webtrends On Demand used a different method to assign user rights in previous releases, Webtrends On Demand administrators should plan carefully before mapping and applying roles.
Adding Users
The following procedure shows how to add users in Webtrends Administration. For more information about managing users in Webtrends On Demand, see the Webtrends On Demand Accounts User Guide or the Webtrends On Demand Accounts Help.
If you plan to create customized user roles and assign them to the users you create, configuring roles first will save you configuration time. For more information about roles, see “Understanding Webtrends User Roles,” above.
To add a user:
-
In the left pane, click Administration > Application Settings > User Management > Users. A list of the current user accounts opens.
-
Click New.
-
If you want to assign a user role to this user rather than specifying individual user rights, select a role from the list.
-
In the Login Name text box, type the name for the user to use to log in to Webtrends.
-
In the First Name and Last Name text boxes, type the user’s names.
-
In the Email text box, specify the user’s email address.
-
If you want to be able to sort users by an internal group name that is meaningful to your organization, type the name in the Group Name text box. For example, type
Campaign Managersif you want to be able to identify a set of people in that group and adjust their rights or roles more efficiently. Clicking on the Group column in the Users dialog box lets you sort users by alphabetical group name. -
In the User Authentication section, choose one of the following options:
- If you want the user to log in using a network user name and password, select Use OS Authentication for this user’s password.
- If you want the user to log in using a password you specify, select Use Webtrends authentication for this user’s password.
NoteIf your web server is configured for operating system authentication, make sure you provide users permissions on the local machine, or have a domain account. (If you choose not to set up a local user account, use Webtrends authentication.) For full details on setting up a local user, please refer to your operating system’s documentation.
-
If you selected Use Webtrends authentication for this user's password, specify the user’s password in the New Password and Verify Password text boxes.
-
If at any time you need to disable this user’s Webtrends access, select the Disable User check box here. Disabling access prevents the user from logging in to Webtrends. It does not delete or remove the user.
-
Click Next.
-
In the Action Rights dialog, set rights to Webtrends functionality for this user. Click Next.
-
In the Profile Rights dialog, set rights to specific report profiles for this user. For more information, see “Profile and Template Rights,” above.
-
In the Template Rights dialog, set rights to specific report templates for this user. For more information, see “Profile and Template Rights,” above.
-
In the Preferences dialog, specify this user’s time zone, so that all Webtrends events are displayed in the user’s local time.
-
Specify the session timeout for this user. This setting determines how long this user can remain inactive before Webtrends automatically ends the session.
-
The Summary dialog lists the current settings for the user you are adding. To save these settings, click OK. The user is added to the Users list.
About View Only Permissions
For all users who have no other permissions than View Reports, make sure the user has view rights assigned in the template. Otherwise, the user with View Reports only rights will not be ale to view any reports if they are not listed in the template. Users with View Reports rights have access to Webtrends Analytics Reports only.
Users who have View Only permissions are also automatically granted access to view profiles. However, because of the extreme limitation of View Only permissions, viewing profiles is not enabled for these users.
The Webtrends Analytics Reports User’s Guide is available for those using Webtrends Analytics Reports. You can download this guide from the Webtrends Customer Center.
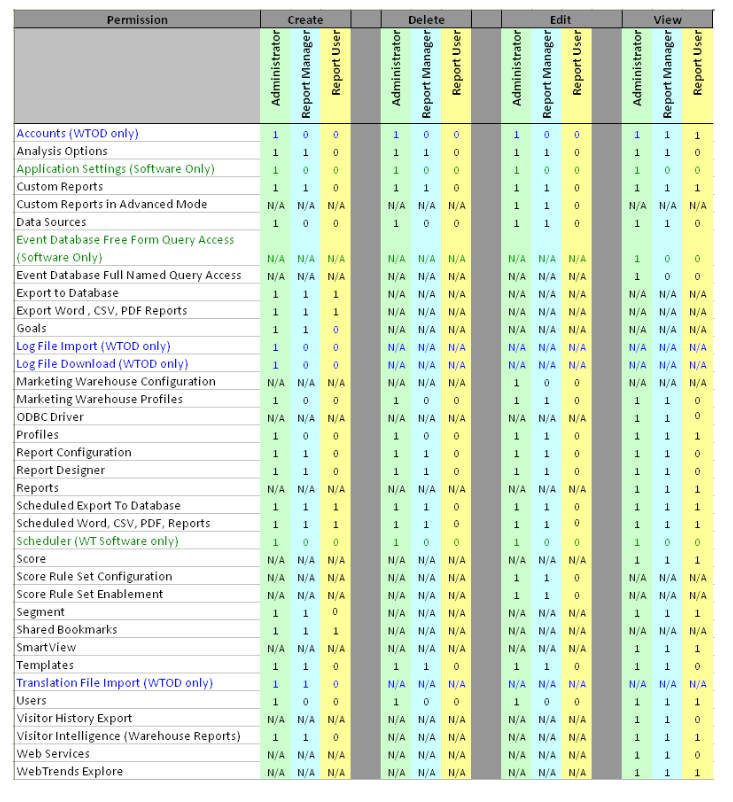
Predefined Role Settings
The following graphic shows the settings for each of the predefined user roles included in Webtrends. You can use this comparison to determine whether the predefined roles are appropriate for your users. Settings marked N/A are not available rights for a specific feature or functionality.